Aperture Definition and Aperture Use in Wedding Photography

Knowing how to utilize your aperture can transform your photos.
Let’s start with the aperture definition – properly defined, it’s the hole in which light passes through in the lens. It’s width changes, and is completely oriented and controlled within the lens, not the camera body. So each aperture can be different for each lens. It works in tandem with the shutter speed and ISO to create a well-exposed image. The wider the aperture opening, the more light it lets, in, and thus, the faster the shutter speed can be and/or the lower the ISO can be, which can create very different looks for the same image, just by changing the aperture. The depth of field and guiding the viewer’s eye are all important parts of using the aperture. In this article, we’ll dive into the aperture definition in all of these aspects and explain how to use them in wedding photography. We’ll also touch a little on composition when it relates to the Fibonacci spiral and the aperture together.
We talk about shutter speed in a different article, but for now, let’s focus on aperture.
Aspects of Aperture
Focal Plane
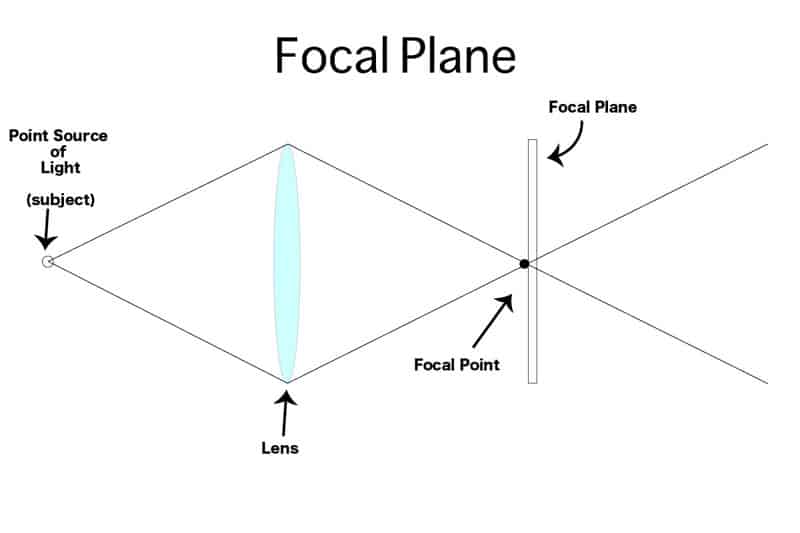
Know how to use your camera’s focal plane (sensor or film)
There are many concepts that contribute to aperture’s definition, and the functionality of your camera’s focal plane is one. The focal plane is simply the sensor or film in your camera where the light entered is focused. It’s really that simple. Now, how does this apply to getting a focused image? The point source of light (your subject) emits a light that expands before being captured by your camera. The light then travels to your camera’s lens, where it begins to focus. When the light intersects or converges, you now have a focal point. In order for your camera to focus and deliver that sharp image you’re anticipating, that intersecting point (focal point) has to hit on your focal plane (sensor or film). When it reaches your focal plane, you will receive what we perceive as a sharp image. Simple!
Note that although your focal plane cannot necessarily move, your focal point can, causing your image to become out of focus. This can be caused by several things, such as changing your aperture. When you change your aperture to dictate how much light you want to let into your camera, you begin to change how the light travels to its focal point and may miss the focal plane. But don’t fret, there is a secret aspect of aperture that we’re able to utilize that will aid our imperfections.
Circle of Confusion

The circle of confusion will increase your chances of sharp image
What if I set my aperture slightly off, is there a way to still be in focus? Why, yes! That would be called the circle of confusion. The circle of confusion is the area slightly before and after the focal plane, which our brains accept as “in focus”. Now although that sounds like a big relief, you still have to be cautious. Because your circle of confusion can be narrow or broad, depending on your aperture. The diagram below will show that when you open your aperture wide with a lower f-stop, the light intersects into your camera in a broad way. The circle of confusion, in return, becomes narrow which doesn’t leave room for error. As you can predict, when you move towards a higher f-stop, the light intersects into your camera in a narrow way causing your circle of confusion to grow. Making it more likely for an “in focus” image.
This concept can become extremely helpful in a fast pace environment, such as sporting events, parties, and especially weddings. As you change your aperture as needed, you have to make sure to compensate for other elements other than your focal point or circle of confusion. Such as you’re depth of field.
Depth of Field
Depth of field can tell your viewer what to focus on.
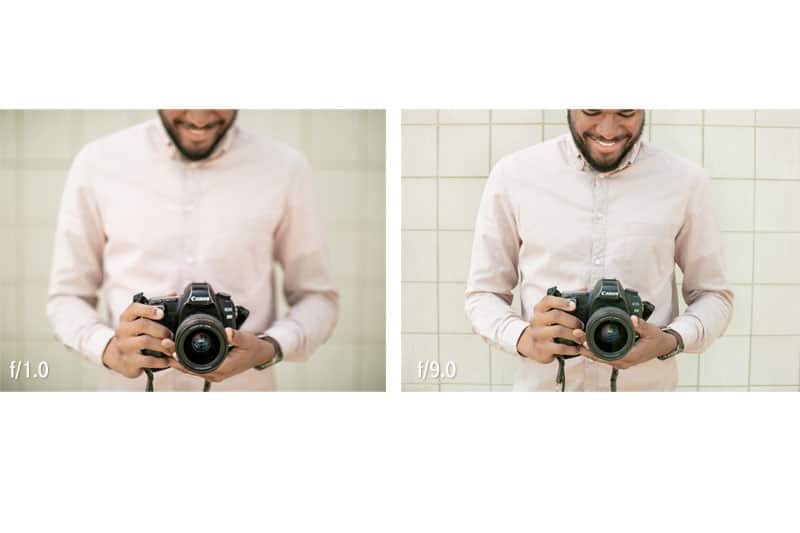
How do I get that nice blurry background for portraits? How do I get all 27 of the bride’s family in focus? It’s all about controlling your depth of field. The depth of field (DOF) is defined as the distance between the closest and furthest points in an image that is acceptable as in focus. The area between those two points is your field, and you can make that field shallow (small) or deep (large) by changing your aperture.
In the images above, you can see by setting your camera to a smaller aperture, like f 1.0, f 1.4…, it creates a smaller field or plane of focus. Through creating that smaller field, you are able to achieve sharp focus on the camera and my fingers, but blow out anything in front or behind. Now when you begin to set your aperture to a larger aperture, like f 2.8, f 9, f 20…., you create a larger field for more things to be in focus. In the image above, you can now see my whole body and the background comes into focus. This could be used when shooting anything where you would need more things in focus, such as larger groups or landscapes. So it’s important to know what type of photo you’re taking and what do you need to accommodate for to assure you get all you need in focus.

Two separate examples of depth of field
Guiding The Eye
Guiding the viewer’s eye is one of your main objectives when using your aperture. You want to predetermine what your viewer is going to focus on to better tell your story or make your point. You apply a shallow depth of field to obliterate any other distractions and only allow the viewer to see whats in the plane of focus. Or you might increase your aperture, letting any and everything that is within your composition to be in focus to tell another story or to even allow your viewers to interpret their own story with what they can see.
So not only do you need control of your aperture, amongst other things, but you also need control of your composition. Let’s go over a composition concept that is underused, but is highly effective when trying to achieve a strong image.
Fibonacci Spiral
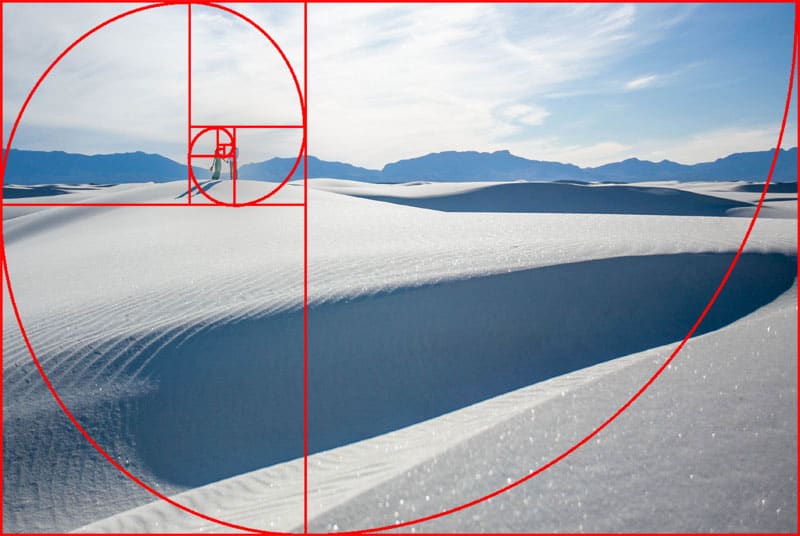
The fibonacci spiral or golden ratio is a compositional guide used to create a photo where the viewer’s eye is lead through the rest of the photo to your main focus. The difference with the fibonacci spiral from other composition concepts, like the rule of thirds, is that it was created completely balanced which is proven to be more pleasing to the human eye. The origination comes from the fibonacci sequence (0,1,1,2,3,5,8,13..) which is a series of numbers where the next number is calculated by adding each previous pair of numbers. Iconic artwork such as the Mona Lisa and The Last Supper have been created using the fibonacci spiral. Because of the balance delivered from the spiral, you are able to allow your viewers to travel throughout the entirety of your image before ultimately reaching your main focus. Which is just incredible.
Using the spiral should not be difficult and is quite artistically liberating. No numbers or calculations are needed. You can also place it upside down, vertical, or horizontal. It doesn’t matter. Because any way you put it, the spiral will be balance unless you manipulate it out of its original shape. If you are a user of lightroom, you can obtain the fibonacci spiral by going to your crop tool or hitting the [R] key and going through your crop tool overlays. From there, lightroom will provide you with a fibonacci spiral which will hover over your image.
Fibonacci Spiral using the aperture
Your aperture and composition, go hand and hand with each other. Where your composition allows the photographer the ability to guide the viewer’s eyes towards its focus, its the job of the aperture to control what the viewer focuses on. So without one, you’ll either end up with a blurry mess or a confusing canvas.
If you have any questions, we’re here to help! Be sure to contact us today to set up your consultation.
Want to view more beautiful wedding images? Check out our galleries here!
Article by Clane Gessel Photography